Gathering Threads

Tutorial: Smocked Herringbone Baskets

Posted by on Jul 10 2014

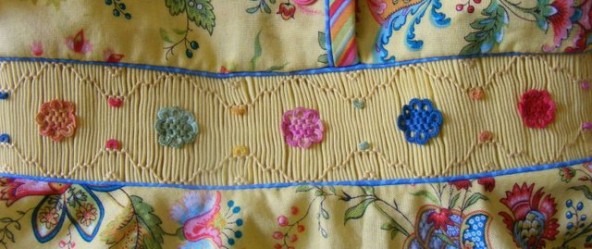
I got a lot of questions (and kind compliments) when I posted pictures of my Grace Knott WIP in the spring. Many of the questions dealt with the flower baskets, which look uncannily like real wicker. Folks were curious to know what stitch I’d used and could I show them how to do it? Then answers to those questions are herringbone and of course, I can. That’s why I have a blog!

DSCF2546

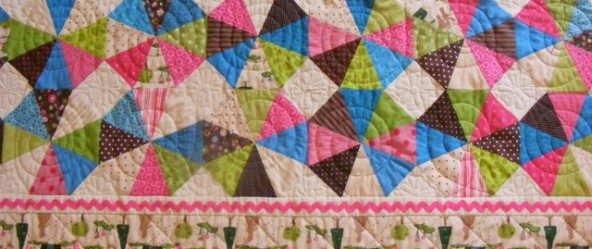
Happily, working these baskets in herringbone stitch is as easy as working them in stacked cable. Open herringbone (and its relative closed herringbone) are less familiar to many smockers than stitches like cable or trellis but ever since I encountered it in my Advanced Stitches course, I’ve loved them and use them often in my own designs. I’ve successfully used closed herringbone to replicate Christmas trees on a bishop, and again in my Smocked Laces design. I’ve never seen anyone else working baskets with this stitch (although what I don’t know about smocking would fill a good book :)), but it’s always nice to have a variety of techniques on hand to personalize and change up a plate to give it a fresh or different look.  They can be used in place of existing stacked cable baskets or added as a new detail.  Heck, turn them upside down and they’d make great beehives!

This tutorial will show you how to work a single basket worked with five bands of open herringbone.  In terms of the stitch’s anatomy, herringbone is worked from left to right, but unlike most smocking stitches that cover two pleats (one old, one new), both open and closed herringbone cover three pleats (two old, one new), giving it its distinctive slanted, cross-over effect.

The size of  this basket is one and 2/3 rows deep by 22 pleats wide.   My herringbone baskets are worked with 1/3 spacing.  I found this a good scale for a child’s garment, but baskets can be made larger or smaller, simply by increasing the number of rows or even the scale of the open herringbone from 1/3 spacing to 1/2 spacing or even larger, once you have mastered the basic technique.   I am using three strands of DMC floss, stripped and reassembled, and a no. 7 embroidery needle. I will work each row in a different colour, to make it easier for readers to distinguish between them, but typically, you would work the entire basket in a single colour.

Working Directions

1. Secure the floss on the wrong side and come to the front between pleats one and two on row 1. Go back through pleat 1, emerging on the left side.

herringbone basket tutorial (1)

2. Carry the floss down.  Go back through pleats 3 and 2 on row 1 1/3. Your floss will lie on a downward angle across pleats 1, 2 and 3.

herringbone basket tutorial (2)

3. Take your needle back up to row 1. Go back through pleats 4 and 3. The floss will cross itself and lie on an upward angle now. Make sure each leg of the stitch lies smoothly and isn’t twisted or tangled. The smoother the floss, the more the stitch will look like wicker.

herringbone basket tutorial (3)

4. Take the need back down to row 1 1/3 and go back through pleats 5 and 4.

herringbone basket tutorial (4)

5.  Continue the herringbone stitch across the row, alternating up and down between row 1 and row 1 1/3,  until you have covered 22 pleats.

herringbone basket tutorial (5)

6. On the final stitch of the row, you will only cover two pleats, not three. This partial stitch will make the pattern look complete, but is very small and isn’t carried all the way down to row 1 1/3 (more like 1 1/6!).  It’s a fill in stitch. Once you’ve worked it, take the floss to the back, and tie off.

herringbone basket tutorial (6)

7. On the second, third and fourth rows, you will cover two fewer pleats with each row: one less at the beginning and one less at the end, so the sides of the basket taper. Secure the floss for the second row and come to right side between pleats 2 and 3 on row 1 1/3. Go back through pleat two, emerging on the left side of the pleat, so that your floss just touches the stitches of the row above.  Take the needle down to row 1 2/3 and go back through pleats 4 and 3.

herringbone basket tutorial (7)

8. Continue across the row, ending with a partial stitch over pleats 20 and 21.

herringbone basket tutorial (8)

9. Using the same herringbone stitch pattern as before, and maintaining the one third spacing, complete row 3 (18 pleats covered between row 1 2/3 and row 2) and row 4 (16 pleats covered between row 2 and 2 1/3).

herringbone basket tutorial (9)


herringbone basket tutorial (10)

10. The fifth and final row is worked in the same fashion, except that I chose to “round” the bottom of my basket by decreasing by two pleats at the beginning and end, instead of the single pleat like rows 2-4.  My fifth row is worked over 12 pleats between row 2 1/3 and 2 2/3.  This is optional – if you prefer to keep decreasing by a single pleat at each end and work it over 14 pleats, that’s fine, too.

herringbone basket tutorial (11)

And that’s all there is to working a basket in herringbone stitch. A few flowers, a couple of french knots, maybe a detached chain handle and your basket is ready to tisket, tasket or any other job you can dream up for it!


Shiny Bright and Candy Coated!

Posted by on Jun 30 2014

I just got my kaledoiscope quilt back from Alison at Sew What Else.

Shiny Brite quilted

You can see the progress I made here and here, as I worked on this quilt, beginning last summer, which is based on the Carrie Nelson pattern, Shiny Brite.

Shiny Brite full view

I picked it up on Thursday and thanks to a long car trip this weekend, visiting the Bruce Peninsula to see family, I was able to get the binding stitched down completely.  It was a perfect activity for the car, although being covered by a quilt on a day that hit well above 30 might have been disastrous but for well-tuned air conditioning.

Shiny Brite border

I really like it.  Alison captured the fun, child-friendly vibe of this quilt perfectly.  Each kaledoscope block is accented with a free hand swirl while the small cream corner squares have a tiny little flower in them.  It doesn’t take itself too seriously, but works to bring together the busy, scappy colours and blend them into a coherent whole.

Shiny Brite close up

The border, with its fussy cut gingerbread houses, is quilted with cross-hatching, which is a nice counterpoint to the more fluid design used in the quilt centre..

Shiny Brite quilt

This is intended for good friends of ours, who have three little girls.   I can hear their dad now.  “Just what I need in this house – more pink!”  Yup, my thoughts exactly 🙂

I finished the quilt with a bias cut binding, using one of the pink fabrics I also used for the blocks.  The pink and white Tanya Whelan print reminds me of candy canes and I thought it finished the edge perfectly.

Shiny Brite corner motif

On the back, I used an all-over pink and magenta chevron.  It’s almost as cute from the back as it is on the front, because the cream thread really pops against the bright pink.

Shiny Brite backing

In case anyone beside myself is keeping count, this is another UFO, which makes it number three for 2014 (2 quilts, one smocked outfit).


Ellie aka Elsa’s ‘Frozen’ dress

Posted by on Jun 19 2014

Sometimes, we do crazy things for the people we love.

Case in point, when the boys and I were up visiting my brother and sister in law a couple of weeks ago, and the movie “Frozen” came up (probably because Andrew was singing Let it Go For the ten millionth time and I was considering letting him go — onto an ice flow!), Ellie made a request. “Aunt Claire, could you make me a dress like Elsa’s?”. Inside, I was screaming “Gack! Sequins! Slinky knits! Sparkles! Synthetics!”. The trifecta of horrible fabrics, in other words. Outside, I said, “Sure, sweetheart. I’ll do my best.”

Elsa Frozen dress front

Oh, the effectiveness of big, blue eyes. In ten years time, there won’t be a teenage boy left standing for three counties. 🙂

Happily, I’m glad to report that sewing this dress wasn’t nearly as dreadful as my imagination made out.

Elsa Frozen bodice close up

The blue sequin fabric is a turquoise knit that I found at Ann’s. They told me they sell at least five dresses worth of this fabric everyday and have reordered it at least twice since January. I got 1.75m, because I wasn’t sure how much I would need, or even what pattern I’d be using, but after cutting the pattern out, I realize that 1.4m would have been plenty (and if you were making a smaller size, and were careful with your layout, you could probably get away with even less).  Unfortunately, they didn’t have any sheer knits in the right shade of blue for the sleeves or neckline.   But a quick trip across the border to Joann’s solved that problem admirably and I was able to get both the sheer knit and the sparkly synthetic organza that I needed for the cape, plus the zipper, for under $10US.

Elsa Frozen dress side view

The next question was what I was going to use for my pattern.  A google search turned up a lot of no-sew or low-sew options but very few suggestions for actual patterns that would work well with the sequined fabrics or had big, poofy gathered skirts, when Elsa’s silhouette was much more streamlined.  When I make a costume, I want it to be durable and comfortable, but I also want it to look convincing.

Lo and behold, I had the answer in my stash.  Simplicity 5827 might not look princess worthy at first glance but as soon as I saw it, I knew it was perfect. It’s a simple, long sleeved dress with a smooth, circle skirt that zipped closed in the back.   That sounds like Elsa’s dress to me, which meant alterations would be minimal.

Simplicity 5827

Of course, ease was going to be an issue, since the Big 4 always run big.  Add in the fact that the pattern was designed for wovens and I was using a knit,  I knew that the pattern would be much too big if I sewed it as is.  But it was an easy fix – all I did was cut off the 5/8″ seam allowances and used 1/4″ allowances instead.  That created the close fit I was looking for without requiring any redrafting on my part.

I made four other changes to the pattern before I cut it out: 1. adding to the skirt length (from knee length to ankle) 2. lowering the waist 2″ and creating the slight basque shape 3. redrawing the neckline into the shallow scoop shape and 4. dividing the bodice front and back into an upper yoke and a lower bodice.

Then it was time to cut out.   The sequins were slippery and did a number on my sheers.  I knew they would and used a pair that needed to be sharpened anyways.  Just a warning, if you’re cutting these, don’t use your best pair.  They’ll be ruined in no time flat.   The sleeves and the upper yoke were a piece of cake by comparison.  I just had to be careful pinning them, because the sheer knit did have a tendency to run.

Elsa Frozen dress back

The cape was simultaneously the easiest part and the trickiest part.  No pattern.  Just 1 yard of 54″ wide synthetic organza.  I cut it across the grain, because I wanted the long train effect.  I eyeballed the curved lower edge and cut it out without even marking it.  It’s a costume – who’s going to check?? 🙂  The problems arose with the pressing.  This stuff melted if you looked at it funny, which meant pressing in the narrow rolled hem was out of the question.   And it refused to play nicely with my rolled hem foot.   I ended up foregoing the pressing between stages and did the narrow hem by hand.  It looks good enough.  Again, it’s a costume.  Who’s going to check??

Elsa Frozen neckline

And a caveat if you’re planning an Elsa dress of your own.  Expect glitter to go everywhere.  I have glitter on my hands as I type.  There is glitter in my hair.  There is glitter on my ironing board and on the floor and in my machine.  It will get everywhere!  Be at peace with the glitter or it will drive you crazy.

The last piece of the puzzle was adding the cape to the dress.  If I added the cape straight across, then it wouldn’t be possible to unzip the dress.  I saw some clever ideas using velcro to attach the cape to the dress but that would necessitate dying the velcro (not in this lifetime!) or snaps, but I didn’t think that would hold up long term.  My solution was to insert a really narrow placket, about 10″ long, at the CB, into the cape itself.  It lets you access the zipper and makes it possible to get into and out of the dress easily.  I was afraid it would distracting but the fullness of the gathers hides it admirably.  I finished the upper yoke with a tiny hook and eye, which was the only hand sewing, besides attaching the snowflake brooch, I did on the entire project.

Elsa Frozen Back close-up

Everything else was done on the machine.  I don’t have a serger, so I sewed it all on a conventional machine.  I used a narrow zigzag stitch (W1.0, L. 1.6) for the seams, so the stitches wouldn’t pop and then overcast the raw edges with a stretch overcast stitch.   Nothing is lined.  A narrow strip of lightweight interfacing supports the zipper.  The only other notion that I used was clear elastic, which I stitched on top of the horizontal seams on the shoulder and along the shaped bodice where the sheer knit and the sequined fabric met.  It keeps the knits from stretching out of shape.

All told, this project took about 1o hours to make, from altering the pattern to cut out to actual sewing.   I will send it up to Ellie this week by mail.  I can’t wait to see what she thinks!


Paisley Park – Another UFO Finish

Posted by on Jun 12 2014

I made great promises in January that this year was to be the year of UFO finishes!  This was the year!!  I was determined.  So, I got two quilt tops made over the Christmas break and then everything seemed to grind to a halt.  Drat that school!  And work!  Oh, and I live with some people.  Very demanding, these family types.  They apparently like clean laundry and time spent and dinners eaten.  So unreasonable. 🙂

Paisley Park smocked top and shorts

But my UFO dream wasn’t forgotten, despite my obligations, and I’ve been trucking away, although I haven’t had much to show for it here on the blog.  It’s been jobs like sewing on buttons or inserting elastic.  Hardly inspiring and definitely not work the effort of documenting.  But I’ve finally got something to show for my UFO efforts.

Paisley Park back

Here is Paisley Park, a very unfinished object that has been languishing in my stash, all cut out, but never sewn, for a couple of years.  It’s a cute top and shorts set from AS&E #83, designed by Kathy Dykstra.

Paisley Park bodice

I’ve made it before for Ellie using pink and green floral and like all of Kathy’s work, it was impeccably designed.  I’d intended this for Ellie, as well but she’s now a tall slim, almost six year old and this is a size 2-3.  Oops! 🙂  Thank heavens for cute little sisters.  Celeste is still too small for this but next summer it should fit her perfectly.

Paisley Park bodice detail

The fabric is OOP from Connecting Threads.  As soon as I saw it, I knew I wanted to make this pattern with it again.

The smocking was very quick.  To add some interest to the big flowers, I smocked them all using variegated flosses.  Some are more obvious than others, but it adds dimension to them, I think.  Also adding dimensionality – the cat hair on the pink flower, which I totally missed until I saw it here, blown up nice and big… 🙂

Paisley park smocking CU

I didn’t have enough of the stripe to bind the bottom edge of the top, so I simply faced it with more of the yellow paisley print.  It works well and actually gives a lighter look to the overall design.

I kept the shorts simple.  They’ve got a mock cuff, cut on the bias, and topped with mini piping.  I prefer shorts finished like this – it gives them a good weight, so they hang well, but you don’t have to deal with the issues of cuffs getting wonky or flipping down.  Just pull ’em on and they’re good to go.

Paisley Park cuff detailSo now my 2014 UFO count stands at 4 – two quilts completely finished (Spring Bouquet and Aunt Gracie’s Garden), one quilt top pieced (Shiny Brite) and this outfit.  That’s not bad.  I’ve hauled another UFO (even better aged than Paisley Park) out of my stash and have begun sewing it again.  When I get that finished up, that will bring my count to 5 – leaving me one more quilt top to finish piecing, and another quilt still to bind.  How are you doing on your UFO’s this year? Any breakthroughs or is it just status quo?


Revealing my Spring Bouquet quilt

Posted by on Jun 10 2014

I’m very proud to reveal the finished version of Spring Bouquet, the enormous applique project that I worked on through the latter half of 2012 and into 2013. It’s been finished for a couple of months, but renovations meant I didn’t have a space large enough to lay it out, and take photos that would do it justice.

springbouquetcomplete (13)

I can’t give enough credit to Alison, my long arm quilter.  Her work is what makes this quilt as extraordinary as it is.  She spent many hours, bringing the applique to life.

springbouquetcomplete (3)

The motifs, like the flowers, are eclectic, with a light-hearted feel.    The batting is wool, and it gives a fabulous loft.  At the same time, the quilt, despite its size, is very light.  If the budget allowed, I’d do all my quilts with wool!

springbouquetcomplete (5)

I bound it with a dark maroon batik, which was one of the fabrics I used for the flowers.  I prefer narrow bindings, and this one finishes at 1/4″.

springbouquetcomplete (6)

The quilt size finishes to 74″.  Each of the nine blocks is different, while the borders use the same pattern, but with varied colours.

springbouquetcomplete (8)

I’ve started on my next applique project, which I am pleased to report has nowhere near as many pieces.  It’s a new Kim Diehl pattern, which I hope will end up in our master bedroom.   But there’s no timeline for it, so I’m going to savour my finish of Spring Bouquet and revel in getting it crossed off my to-finish list!