Gathering Threads

Guest Blog: Thoughts on the Internet and Creativity

Posted by on Apr 28 2012

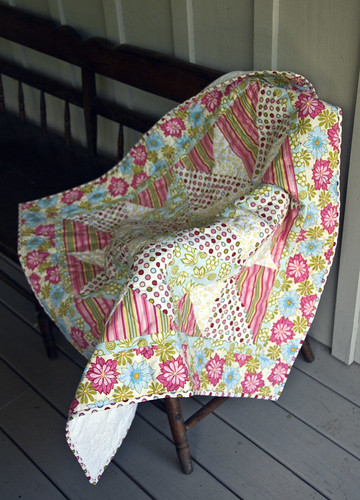
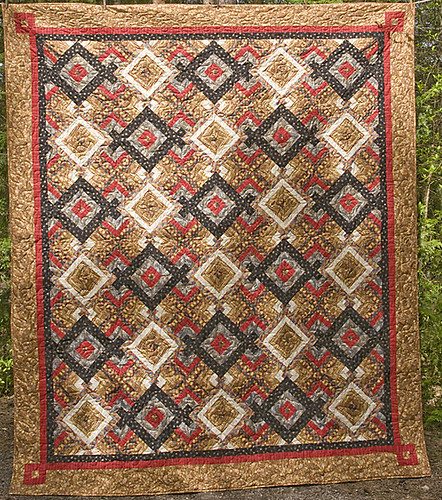
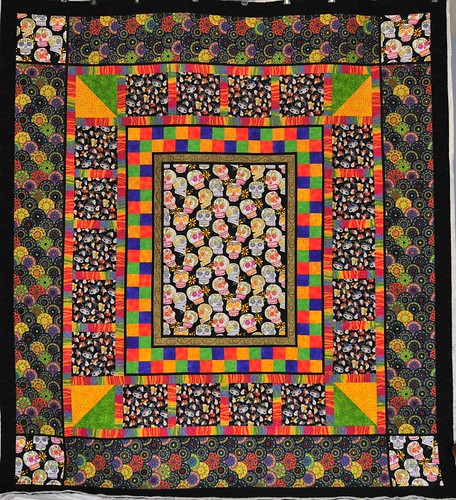
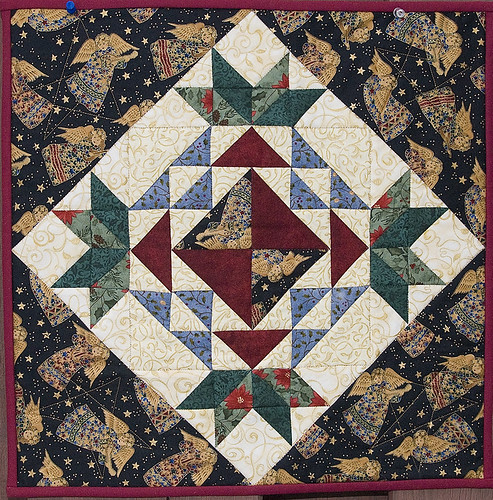
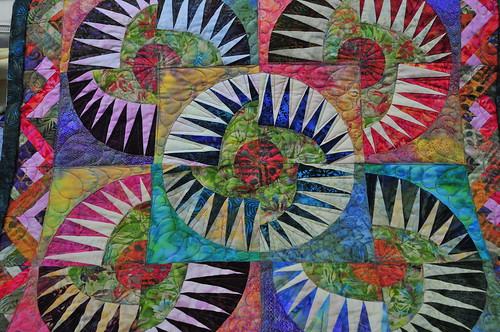
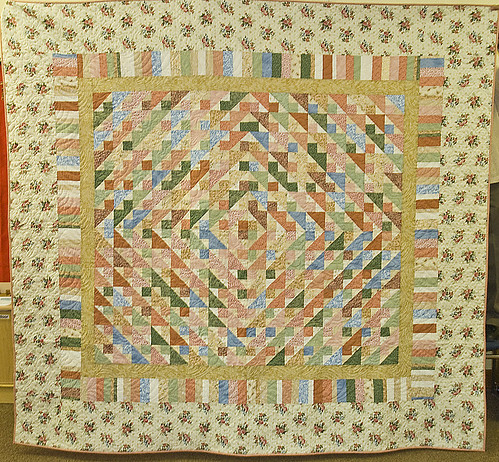
I’m very happy to welcome Alison McDonald to my blog to share her thoughts on the internet and the rewards and challenges it offers to sewers and those who create.  She runs “Sew What Else?” here in Hamilton, ON, offering custom long arm quilting services to quilters.  She is also the local coordinator of the worthy charity, Quilts of Valour, which donates quilts to injured Canadian Forces members and their families.  It’s a great cause.  Alison is a very talented quilter who did the quilting on  David’s guitar quilts, which I’ll be posting here on the site in the next little while.   To learn more about Alison, you can visit her website, Sew What Else or check out her flickr account for a small sampling of the really incredible quilts she’s worked on.  Please join me in giving Alison a warm welcome today!

***

As a longarm quilter I use the internet frequently; I receive orders and instructions from my customers, I download pantograph patterns, I buy useful gadgets for my chosen occupation,  I read forums that bring me the latest on quilting in general and long-arming specifically, and sometimes I even get paid for my services through the internet.
Emmy's Quilt
Creativity is variously defined as the ability to come up with something new, something which has some value.  So how do we define the ‘new’, and how do we assign a ‘value’, and where do people like me fit in?

Hidden Wells

I have maintained for many years that I have only the faintest creative ‘vision’; that is , I look around and feel if not down-right intimidated, certainly lacking in the appropriate amount of creativity. This has never been more apparent than in this age of the internet. On a daily basis I feel swamped by the incredible talents of folks I’ve never met and likely never will…it’s overwhelming what’s out there…it’s also totally overwhelming when you think about the body of collected work from all humankind…is there really anything that is ‘new’…and who defines ‘useful’?

Candy skull Quilt

Many with an even greater capacity to grasp conceptual thought processes than I have said; in all likelihood if you thought of it, someone else probably already has. How do we continue to put notes of music, words of text, and scraps of fabric together and still make creativity a part of our lives, and not infringe on others’ right to do the same?

Christmas Table Topper

Recently on the internet we have seen some nasty arguments over copyright issues, and intellectual property, some of it even spilling over into the traditionally serene (picture your white haired granny and her friends at the quilting frame here) and genteel world of quilting.

Much of the work I’ve done over the past few years, though important and useful to its owner probably does not warrant the kind of attention the internet can spawn. Truthfully time and lack of equipment have also played a part in the lack of a cohesive ‘body of work’ up until the present time. Time and resources can fix that.

Helen's NY Beauty wallhanging

…so now back to the internet, I have toyed with the need for or the desire for an internet presence…web-site, blog, social media outlets, on-line picture album, some of the above? All of the above?  I know above-all that I need to do something, but what? And in view of the tempest in a teapot that is the on-line quilting world; do I REALLY want to?

Spring Garden

When it comes to the internet I’m no newbie, and certainly no Luddite; but coming to grips with the ever-present and ever-changing landscape that is the internet is /can be scary… a grind…a challenge…and, certainly when a friend innocently shares a link to my on-line album… exhilarating.

Happy creating!!

Enigma Embroidered Spring Coat

Posted by on Apr 02 2012

I don’t do a lot of ‘straight’ hand embroidery.

If I do embroider, it’s often in conjunction with my smocked projects – bullions, feather stitch, that sort of thing.  But last winter, I fell in love with the most gorgeous embroidered jacket from a back issue of Inspirations #12 (1996) called ‘Enigma’.    The knit jacket features the most glorious band of embroidered flowers round its hem and I knew I had to make it.  Isn’t the cover delightful?

Only one problem.  I can knit.  I’m not bad.  My tension is good and I can follow fairly sophisticated patterns.  But I don’t *like* to knit and I’m slow.  So the idea of first knitting the jacket (and sizing it up, to boot, since the pattern in the magazine was for a 6mth old) and then embroidering it didn’t appeal.

But when I found a deep navy wool coating on a trip to Lens Mill recently, I knew exactly what I was going to do with it.

To start, I found a pattern with similar details as the knit sample – round yoke, full hem, straight sleeves.  I’m making a swing coat from the Fall, 2008 issue of Ottobre in a size 98cm.  I’ve made before in corduroy.  It’s perfect and I knew it would fit.

Next problem, how to get the design onto the thick, dark fabric.  Tracing was out.  The pattern suggested waste canvas but seriously, the idea of pulling all those teeny-weeny canvas threads out after I was done was *not* appealing.   I could have pricked and pounced (Mary Corbet has some great ideas for transferring embroidery designs, btw) but I was really looking for easy.  Painting my lines on with water colours doesn’t scream easy.   So I went another (far less traditional) method and used water soluble stabilizer instead because that’s what I had on hand.

As a result of my experiences embroidering this jacket, I will definitely use this method again.   The stabilizer is clear and thin; I was easily able to trace the design.  Here you can faintly see my pen markings, as I complete this hollyhock.

It was a breeze to stitch through.   To hold it in place, I simply basted it down around the perimeter.  Typically, I stitched stems and leaves, then blooms.  The only exceptions were the daisies (french knots first) and the agapanthus, which I found were much easier to complete if I stitched the yellow round of french knots first.  Last but not least came the grass, which I’m still finishing up.

Now that I’m nearing the finish, the excess simply tears away and all the small bits caught under my stitching dissolve in a cold bowl of water.

And because I’m always interested in seeing the backs of things, here are a few shots of the wrong side, liberally adorned with white cat hair.  (Note to self: Don’t start a dark navy project and lay it over the back of the sofa whilst the calico is in the process of shedding winter coat.  Very visible results :))

I did shape the embroidery because the swing coat has quite a pronounced curve but it won’t be nearly so evident on the finished coat.  It will look straight, trust me.  But in the meantime, look at all these scrumptious flowers, though.

Hollyhocks and daisies.

Queen Anne’s lace (btw, I took out this grass that you can see in this picture and the one above – it was too vibrant for the rest of the colours and drew attention to itself.  I’ve since replaced it with a WDW overdyed floss – much nicer)

Lavender and canterbury bells.

Two agapanthus.  Or is it agapanthi? 🙂

Aren’t the flowers delightful?  I really do love the way this project is turning out.   I did change my threads – the original is worked in crewel wool, but I used DMC embroidery floss, since it would have cost a significant amount to buy all of the required shades for a one off project and I  just don’t do enough stitching with wool to justify it.  In my next post, I’ll be sure to show you the embroidery when it’s free of the stabilizer and then show you some of the construction details of the coat itself.

A new quilt project underway “Plaid Stars”

Posted by on Apr 02 2012

It took me ten months to finish David’s guitar quilts.

I moaned.  I procrastinated.  I knashed my teeth and wailed.

So guess what I started on this week?

Another quilt 🙂

Yeah, yeah, I know but even if chain piecing will never fill my heart with rainbows and butterflies, I love the look of quilts. That means if I want to enjoy, I have to sew them.

This time, I’m doing a far simpler quilt from the Winter issue of “Simple Quilts and Sewing” called ‘Plaid Stars’.

Simple Quilts and Sewing Winter 2011

It’s a nice quilt, with lots of rich colours, but not overly busy or scrappy.  I’m thinking of making this for a friend of ours.  He’s older, and I wanted something classic and masculine but not fuddy-duddy or fussy.

Almost all of the fabrics are from Connecting Threads.  They were a new to me online fabric company and I have to say, I’m very impressed.   The prices are hugely competitive (some of the prices were under $3/yd).  Shipping to Canada was a breeze, too, which is often not the case and more than reasonable.   I placed my order on a Wednesday and by Monday at lunch, my fabrics were on my front porch. The quality of the fabric is very good, too.   I will definitely be ordering from them again.

The sample quilt was done in flannel but frankly, I don’t find much modern flannel holds up.  It pills and fades.  If I’m going to put the time in, I’d rather use a standard quilting cotton.  I have three shades of burgundy-red, three of olive green, a lovely gold print and a creamy white with a small tan print.

I ended up picking up the few fabric colours I couldn’t get from Connecting Threads locally and despite the fact that I was only getting 2 1/2 yds, they cost me almost as much as the rest of the quilt fabrics put together.

Look at the backing fabric!  It’s really ideal for the colours of the quilt and it was a steal at $4 and change/yd.  It really has all the right tones and even echoes the plaid theme that the front has going on.

I’ve already got the quilt cut.  I strip pieced the green strips over the weekend and have started marking the snowballs and half square triangles.  It’s a much faster quilt than David’s guitar quilt, especially since I’m only making one.   We’ll see how it progresses.   I’ve still got lots of spring projects I want to get done, including an adorable embroidered coat I’ve been working on for the past little while. I’ll show you some of my progress pics of that project soon!

Are Petunias a Sign of Spring?

Posted by on Mar 04 2012

Is it spring yet? I don’t know. It’s March now but the temperature has been all over the map. Below freezing one day, soaring the next. It’s enough to give a person whiplash. All I know is I’m tired of winter clothes.  I want flowers and warm temperatures and no heavy coats.

So last weekend, I whipped out my Ottobre’s and traced off a whimsical spring dress called “Petunia” from the Summer 2008 magazine.   Here’s what their version looked like:

Petunia Ottobre 2008

As normal for Ottobre, the fit is generous.  I sized the pattern down to a 98cm (size 3) and although the height measurement is correct, it still fits comfortably on Stanley, who’s a 4.    I’m not too worried though, since everything was stash. I picked up the bright red and white floral last year on the discount table, because I’ve long had my eye on this dress (1m for $3) and the gingham is leftover from my shopping trip in Paris last year (I used the rest for a Hallowe’en costume).   I keep promising myself that I’ll cut back on the fabric expenditures and only sew with existing fabric.

Interested By-Stander: And how’s that working out for you, Claire?  Have you stopped buying new fabric?
*crickets chirping*
Claire: Err….If you’d care to direct your attention back to the new dress…

The sleeves are a cute cap sleeve with elastic.  They were super easy – I might be tempted to use them on other patterns because they make a nice change from the usual puffed suspects.  I trimmed the lower edge with bias – I thought I needed a touch more gingham.

There are a series of release tucks around the neck.   I do find they get a bit lost in the business of the fabric.  When I make this dress again, I think I might consider a solid colour so the tucks can be more of a feature.

Rather than extend the bias binding into ties like the sample garment, I chose to make a button loop.  I think it looks neater and I always worry a little about choking otherwise, when you have long ties like that around the neck.

The most interesting feature of this dress is the petticoat and ruffles.  The armscyes are finished using the petticoat.  You sew around the armholes, sandwiching the cap sleeves between, but leave the side seams open.  It’s the same as when you clean finish an a line jumper but simpler because the skirt and the petticoat (or lining) are separate at the bottom you don’t need to leave a hole for turning.   It’s very clean, especially once it’s understitched.

Here’s a shot of the deep gingham ruffle.  Because the two layers are separate from the neckline down, there’s a great deal of loft to the dress – good twirl is so important. 🙂  I even tried my hand at bow making.  Nothing too spectacular, mind you, but two little gingham bows with red button centres are now awaiting their clips.   Making the dress was fun and it gave me hope that spring *is* coming, however sporadic that progress may be.

Tutorial: Pleater Maintenance

Posted by on Feb 22 2012

How’s your pleater treating you?

Is it hard to turn, fighting over every revolution? Does it skew the fabric, even when it’s been cut on grain? Create bubbles in the fabric? Miss pleats? Needles snapping left and right?

You may be casting an evil eye towards your needles and wondering if you have to replace them all (and believe me, a new set isn’t cheap). But before you shell out for new supplies or worse, give up pleating all together, let me ask you, when’s the last time you did any maintenance on your pleater?

If you can’t remember (or only know that the ties were much wider and Pierce Brosnan was on T.V in prime time), it’s time to give your hard working helper a day at the spa.  Now, before you guffaw and say “I’m not mechanical”, I promise it’s easy (seriously, 10-15 minutes), and you should have everything you need right at hand.  Really.

To service your pleater, you need:

  • your pleater (I have a Read 47 row Maxi; your pleater may be slightly different depending on the model and age)
  • a screwdriver that fits the screws on the bottom of your pleater (probably a Phillips or a star, but it may vary in size)
  • masking tape
  • a pencil
  • Q-tips
  • lubricating oil (your sewing machine oil should be fine – read the label.  If not, any good quality lubricating oil designed for metal on metal lubrication is appropriate)
  • wax paper
  • a small, clean rag or soft cloth
  • tweezers
  1. Start by removing the front upper bar.  If there are any needles in the pleater, remove them now.

2.   Next, unscrew the handles from both sides.  Set the handles aside.

3.  Now, turn the pleater so you can see the bottom of the base.  Unscrew one of the support arms from the base.  You only need to loosen one side, not both.

4.  Supporting the loosened support arm so the bars don’t come out yet, turn the pleater right side up.  Holding both the support arm and bars firmly, slide the bars loose from the fixed end.

5.  Rip three pieces of tape approximately 2″ long.   Beginning with the front lower bar, loosely wrap the tape around the first bar.  Label it #1.  Repeat with the upper rear and lower rear bars, removing and labeling them in sequence.  This step is important because you want to make sure the bars are returned to their original positions.

6.  When you have removed the three fixed bars, they should look like this: two bars with short ends and a third with long ends.

7.  Once everything is disassembled, your pleater will look something like this:  4 bars, two handles, two screws and washers, two removable plugs, one unattached support arm and one base and support arm.

8.  Using a clean Q-tip, gently clean the four holes in each support arm.   Change the Q-tip often and continue until the cotton bud is clean.

9.  This is what a dirty Q-tip will look like.

10.  Next, with a clean, dry cloth, clean the ends of each bar.  If there is thread tangled around the ends of the bar, use the tweezers to gently remove it.

11.  Wipe down the base, removing any dust or grime.

12.  Apply the lubricating oil to the supporting arm holes.  I know my picture implies I’m adding the oil directly from the bottle, but my preferred method is actually to put 2-3 drops on a clean Q-tip and and run that through the holes instead.  It’s cleaner and limits the possibility of messy drips.

12.  Put the unattached supporting arm on its side and carefully stand the three fixed bars in placed. Remove the tape as you put them in place.

13.  Hold the bars firmly and slide them back into place.

14.  Align the holes on the bottom of the supporting arm with the holes in the base.  Carefully, tilt the base to expose the holes and reattach the screws.  Don’t forget to put on the washers.  Tighten down the screws until the supporting arm is firm but don’t over tighten.  You don’t want to risk stripping the screws or create problems for the next time you perform a service.

15.  Reattach the handles.  Put the removable bar back in place.  The pleater is reassembled.  There should be no spare parts remaining.

16.  Tear off a small piece of wax paper as wide as your pleater.  Run it through the pleater.  Pay attention to how the bars turn.  Are there any clicking noises?  Does everything move smoothly?   Does everything appear aligned?  If yes, then you are good to go.  If not, go back and repeat steps 3-7 and 12-14.  If you spilled any lubricating oil during the service, or are worried about staining your pleating fabric, run a sacrificial piece of scrap fabric through the pleater before you use any fashion fabrics.

Now your pleater should run like a well-oiled machine, and give you lots of problem-free operation.  I generally service my machine once a year.  Happy pleating!