An Enigma Solved – Embroidered Coat Finished
Posted by Claire on Jul 14 2014, in Embroidery, Sewing for Children
I’m so proud of this coat. As my regular readers know, I’ve dubbed 2014 the “Year of the UFO” and this embroidered coat was the ufo-iest of all my ufo’s.

No more. My version of Enigma, the embroidered swing coat, is all finished. Every last bit from the bound button holes to the swing tacks that hold down the lining.

I started this coat more than two and a half years ago and blogged about the embroidery in some detail. I was inspired by a very early issue of Inspirations (#12). Loved the coat to pieces but couldn’t see myself knitting the coat just to embroider it, too. Besides, it only came in a 6m size.

Instead, I used a dark navy wool coating and a Ottobre pattern from the Winter 2008 issue. It worked a treat. I zipped through the embroidery, got everything cut out, even got a start on the assembly and then…nuthin’. I got busy doing other projects, I misplaced the pattern piece for the sleeve, which meant I couldn’t cut out the lining pieces and Ellie grew.

And every time I looked at the clear zippered bag that incomplete coat carcass or moved it to get at something else, I felt guilty. But my guilt has lifted, because this wonderful little coat isn’t a UFO any longer. Hoorah!
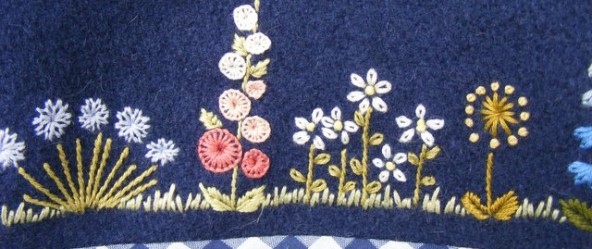
Let me walk you through some details. Obviously, the star of this coat is the embroidered hem. Here it is, all spread out. You can see the ‘swing’ design of the coat when it’s laid out flat. The bottom hem measures almost 1 1/2yds wide, so it was a fair bit of embroidery.

The embroidery is worked with DMC floss in a variety of simple stitches – buttonhole, french knot, stem stitch, straight stitch and detached chain. As I discussed in my first, long-ago post about this coat, I used water soluble stabilizer, basted to the wool, to transfer the design to the coat. It worked really effectively, even if it was a bit unorthodox.
Here’s a gallery of close ups of the entire hem, so you can see the details (and occasionally the cat hair) in its entirety.


Construction itself was, once I got around to it, pretty straight forward. I didn’t want to compete with the embroidery but at the same time I didn’t want it to feel bottom heavy. So to lighten things up, I used a 1/4″ navy gingham check as my contrasting fabric. All of the edges are bound with it, plus it’s also used for the lining itself. This is both a design detail and a solution to the problem working with the very thick coating. Things get bulky and awkward very quickly, and given the scale of the coat, which will be worn by a toddler, I didn’t want things too get too thick.
Here is how I handled the collar. The upper collar is made of coating, with a light fusible interfacing applied to the wrong side.

The under collar is simply gingham, and the edges are bound with bias that finishes to 3/8″ wide. It’s clean and streamlined and I like how it looks when you pop the collar. 🙂

The patch pockets the centre front edges are bound in the same fashion but I handled the hem a little differently. The lining and the coat hem hang separately on this coat. I could have used a facing but again, bulk was an issue. So I cut a 3″ wide piece of gingham bias and stitched it to the bottom edge. From the front, it looks just like the other edges. Inside, you can see the difference.

I folded it to the wrong side, stitched in the ditch to secure the bottom edge and then catch stitched the raw edge in place. It’s completely invisible from the right side, since the coating is so thick and the hem of the lining hangs down and covers it. It allows the layers to move independently of each other and adds zero bulk.

The last detail on this coat are the buttonholes. Instead of simply working a machine stitched buttonhole, I went with three bound buttonholes instead. Again, it was a solution to the thickness of the coating that became a design element.

I was torn between doing navy buttonholes and gingham buttons or gingham buttonholes with navy buttons. As you can see, I went with the latter and I think it was the right choice. Bound buttonholes aren’t hard, really, just fiddly and while mine aren’t absolutely perfect, they came out very consistently, which I think is almost more important.

So there you have it, a major UFO crossed off the list. Of course, it’ll be a couple more years before Celeste is big enough to wear this coat but in the meantime, just knowing it’s ready for her to wear feels fantastic!
Jenny Jo
Ok, now I’m even more impressed! Your finishing details are outstanding! Thanks for all the peeks inside.
Cynthia
I’m certainly impressed! I love the gingham, it works so nicely with the wool and adds a nice contrast.
Heidi
Absolutely gorgeous. It almost looks reversible. I do hope you have someone special in mind that will fit the coat.
Esther
What a delightful little coat, so many pretty details.
Karen
Simply stunning! I always wanted to make the embroidery from that Inspirations issue but didn’t want to knit the sweater, either. Your solution was perfect and your embroidery is just perfection! Bravo!