A Handpainted Monogram Tutorial
Posted by Claire on Jan 11 2012, in Crafts
I painted our entrance hall over the Christmas holidays.
Everyone seems amazed that I tackled it but given the immensely large projects we’ve tackled holidays past (new heated ceramic tile floor in the kitchen, gutting the bathroom, installing a main floor laundry) a little paint on a teeny-weeny kinda room is a piece of cake.
The hall was *green* before and if there’s one colour I can’t stand, it’s green, especially, wishy-washy, my food’s gone kinda mouldy green. Now, it’s a lovely grey with taupe undertones, crisp white trim and lots of black accents. I haven’t taken any finished pictures of the space as I’m still putting the finishing touches on but here’s a little sneak peak with an embellishment project I did to tackle a ‘blank’ space that stood out like a sore thumb.

There’s a transom over our front door. Once upon a time, back when our house was built in 1874, there must have been glass – probably stained glass — in it but it’s been filled in and now it’s just a big white rectangle above the door. Very boring. But have no fear! Thanks to my new obsession with Pinterest, I found the solution.
Initially, I looked a vinyl decals but they were all more money than I wanted to spend, since the awkward space would require a custom decal. So I went to the Graphics Fairy and looked through her selection of swirls and flourishes until I found a simple shape that I liked: something with a vintage style that wouldn’t take me until 2013 to paint.
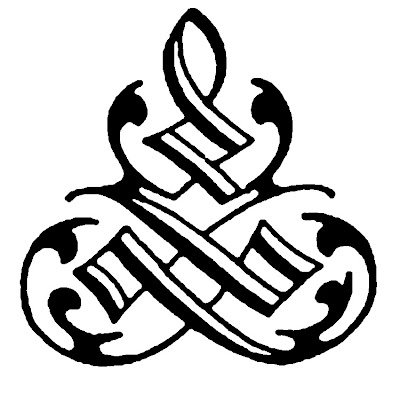
Then, I created an artboard the exact size of my transom (32″ x 15″). I resized and reoriented my swirly doodad in Illustrator and paired it with a half dozen or so different ‘B’s, trying them on for size. Ultimately, I ended up using Imprint MT Shadow, sized to 320mm and slightly fattened.
Next I saved it as a pdf file and printed it by tiling the sheets. Then it was as easy as simply matching the registration marks and taping the page together. If your name begins with a ‘B’ and you want my already tiled, ready to print design, you can get it here. If you want to have another letter, you’ll need to modify it in Illustrator. That file is here. As always, the credit/acknowledgement, plays nicely with others rules are in effect, OK?
To get it from paper to wall, I got a big sheet of 18″ x 24″ carbon paper from the art store around the corner for $0.79 (yup, I’m the last of the big spenders :)) and taped it up against the transom. As you can see in the picture, I then taped my trimmed design on top of it, centering it horizontally and vertically with painter’s tape.

Then, I spent some quality time at the top of my step ladder, tracing over the outlines with a pencil. When I was done, this is what it looked like (I know it’s a little faint but that was the idea – faint is good for the overall project, bad for the step by step photos.) If I was doing it again, I probably would have used a pencil crayon – it was a little challenging seeing my pencil lines and knowing where I’d already traced.

The carbon paper worked perfectly. No smudges, just a clean, crisp line that came off when you rubbed but stayed put if you treated it gently.
Then I got to work painting. I used the same semi-gloss black Pittsburgh paint I used for doing up all of the accessories in the hall. A little went a long way – I might have used two tablespoons, if that. I used a #4 Shader, which is a flat, square brush about 1/4″ wide and a #2 Fine, which I used for doing the thin detailed lines.
I’m sorry I didn’t get any mid-paint pictures but between juggling the palette (a meat tray with a thumb hole cut in one end) and staying inside the teeny-weeny lines, I just forgot. I found that one coat gave nice coverage, with a second, thinned coat to smooth out any wavery lines and uneven spots in the large curlicues.

Here’s the finished monogram and I really like it. It’s got the vintage feel I was going for and the handpainting makes it look personal without getting too ‘homemade’. From start to finish, including the computer design time, tracing and painting was about 2 1/2 hours.
Now the hall is back to normal – jammed with winter coats, messy boots and the mail enroute to the office. But it looks so much better and when I get my photo wall done, I’ll try and show you pictures of the whole thing. Happy painting.
Catherine L
That’s fabulous! And I so envy your 1874 house. I want lots of heavy moldings that I can paint in creamy oil paints. I live in Houston where everything is new, new, new and either too gaudy or too bare.
Claire
Thanks, Catherine. And I agree – old houses have tons of character. Of course, they also usually have small rooms, steep stairs, crummy basements and lots of upkeep 🙂 but hubby and I still keep falling in love with them. We’ve always lived in older homes – house number #1 was a spring chicken: only 1884 LOL.